- May 19, 2023: Updated to include a workflow-only solution and updated the client script to use
N/currentRecordboth thanks to feedback from Elie Ciment.
Table of Contents
TL;DR
Some NetSuite transactions like purchase orders and sales orders can be closed using the “Close” or “Close Order” button that is visible when the transaction is in certain statuses. While reopening a closed order is possible, the native approach of editing the transaction and unchecking the “Closed” column of each item line is cumbersome and sometimes infeasible. In this article, we explore three ways to facilitate reopening a closed transaction via a custom “Reopen Order” button. By the end of this article, you will not just understand the trade-offs between the approaches but will receive sample code to get you going with your implementation.

Challenge
Several NetSuite transactions have the option to be closed. While I do not have an exhaustive list, I found the following transaction types that have a closed state which generally translates to having a “Close” button. Notice that most of these transactions are non-posting, planning transactions.
- Purchase Order
- Sales Order
- Vendor Return Authorization
- (Customer) Return Authorization
- Requisition
- Purchase Contract
- Blanket Purchase Order
- Quote
- Transfer Order
- Work Order
A transaction often needs to be reopened after a user accidentally clicked the “Close” button. Take the sales order, for example. The close button is right next to commonly used buttons as illustrated below. So, a misclick is easy. Moreover, there is no confirmation popup, thus, once clicked, the action cannot be aborted.

Native Solution for Reopening Closed Orders
What NetSuite does upon clicking the “Close” button is to check the “Closed” field on all item lines. Thus, the native solution for reopening a closed order is to edit it and unmark the same option on at least one line.
Tip: Although the documentation often says that you need to uncheck the “Closed” option on all lines, from tests, I’ve observed that it is sufficient to do so on only one line. However, in reality, since you cannot action (e.g. fulfill or bill) closed lines, you typically will need to uncheck the box on all lines.
Issues with Native Solution
While the above approach works, there are a few challenges. For example:
- Editing the transaction and unchecking the “Closed” column on all item lines is cumbersome, especially when there are several lines on the transaction.
- The “Closed” column might not be visible on the transaction form and the end user might not have permission to customize the form, thus requiring the intervention of the admin/support team.
- In some cases, the end user might be allowed to edit transactions in a specific state. For example, there might be restrictions on editing approved purchase- or sales orders by non-admin users. If one of these is accidentally closed, admin intervention is needed.
Tip: Prevention is better than cure. If your users are frequently accidentally clicking the close button on transactions, you may consider editing the form and moving the option to the overflow menu instead as illustrated below. While that makes it harder to access the functionality, accidents are still possible as the user might misclick in the overflow menu.

Solutions
The solutions described next simply mimic the native solution but package that into a button so that the user does not have to worry about the details.
Let’s first look at a two workflow-based solutions after which we will review the corresponding script-only solution.
Solution 1: Workflow-Only Solution (Preferred)
This is my preferred solution and I will tell you why after I have presented both solutions. The idea of this solution is to create a workflow that displays a “Reopen” button. Clicking that button will trigger a workflow action script that loops through the transaction lines and reopens them.
Ideally, I’d have loved to be able to do this completely using a workflow but unfortunately, workflows currently do not support setting field values on transaction lines. Thus, we need the workflow action script to do the work.
I assume a basic understanding of NetSuite workflows. If not, please review the documentation first.


The workflow is pretty simple.
- Start off by creating a workflow with “Transaction” as the base record type. Select the target sub-type where you want to expose the functionality. In the example above, I limited it to Sales Orders.
- Set the workflow to trigger only “On View or Update” and limit it to the “View” event so the button is only visible in view mode.
- Set the trigger type to Before Record Load. Since all we need to do is to show the button, there is no need to trigger it for other events.
- Limit the workflow context to User Interface to prevent it from firing in other contexts where the functionality is irrelevant.
- Add a workflow condition to trigger the workflow only for transactions in a closed state. For my Sales Order example, it would be sufficient to have condition “Status = Sales Order:Closed” but I went ahead and added conditions for all transaction types with a closed state. Of course, you will also need to select the transaction sub-types in the workflow configuration in step (1) above for this to work.
Tip: Limiting your workflow trigger type is a best practice as it prevents unnecessary evaluations of the workflow and thus, improves performance. However, in more advanced workflow use cases, it is not always feasible to set the trigger type to Before Record Load e.g. if we need to perform actions before or after submitting the record.
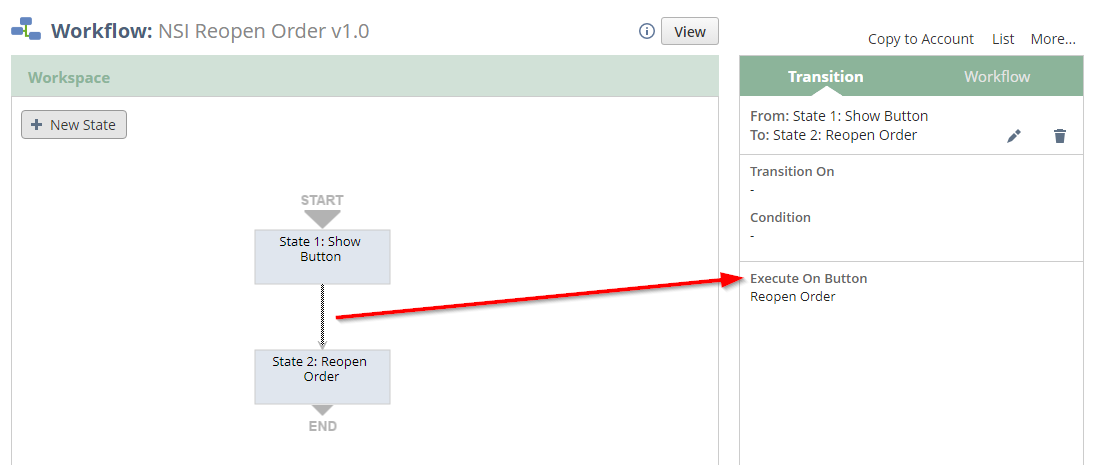
Implement two workflow states.
In workflow state 1, we show the button in the Before Record Load event:

Upon clicking the button, we transition to state 2:
Tip: Avoid unnecessarily triggering workflows by limiting contexts. By default, almost all contexts are selected. In our case, only the user interface context is relevant to the above action. Thus, we limit the context accordingly.
In state 2, we add a sublist action group and add a Set Field Value action to set the closed field to false on all lines of the transaction which effectively reopens it. You can learn more about sublist action groups and how to use them here.

That’s it! Remember to set your workflow status to “Released” after you’re done testing so that other users can see the button too.
Solution 2: Workflow Plus Script
In our current use case, we were able to completely achieve our desired goal using a workflow. However, there are use cases where a workflow alone will not suffice e.g. because the target field(s) are not exposed to workflows or we need to manipulate a sublist that is not supported via workflow action groups. In such cases, we still may opt to implement a workflow in combination with a workflow action script.
Let’s see how we can achieve the same objective of reopening a transaction using this approach.
Step 2.1: Implement the Workflow Action Script
If you are not familiar with workflow action (WA) scripts, take a look at the documentation here. WA scripts basically power up our workflow experience with functionality that is not available in the point-and-click workflow designer.
Here is sample code for your workflow action script JavaScript file (call it whatever you want e.g. <company_prefix>_ReopenOrder_WA.js)
/**
 * @NApiVersion 2.1
 * @NScriptType WorkflowActionScript
 */
define([],

    () => {
        /**
         * Defines the WorkflowAction script trigger point.
         */
        const onAction = (context) => {
            let rec = context.newRecord;
            let closedLine = rec.findSublistLineWithValue({ sublistId: 'item', fieldId: 'isclosed', value: true });
            if (closedLine >= 0) { // At least one line is closed
                for (let i = 0; i < rec.getLineCount('item'); ++i) {
                    // Reopening a closed line is a no-op; so we skip getSublistValue().
                    if (rec.isDynamic) {
                        rec.selectLine({sublistId: 'item', line: i});
                        rec.setCurrentSublistValue({sublistId: 'item', fieldId: 'isclosed', line: i, value: false});
                        rec.commitLine({sublistId: 'item'});
                    } else  {
                        rec.setSublistValue({sublistId: 'item', fieldId: 'isclosed', line: i, value: false});
                    }
                }
            }
        }

        return {onAction};
    });
Tip: Notice that we did not save the record in the code above. In fact,
record.save()is prohibited in NetSuite WA scripts. That is because NetSuite will save the record and reload it after executing the script. From my tests, I also observed that the record is loaded in dynamic mode which makes sense as we trigger the function from the UI, and records are loaded in dynamic mode in the UI. Nonetheless, the above code can handle both modes.
Once you’ve uploaded your code to the NetSuite file cabinet, the next step is to create a workflow action script record. I will not go into the details as the steps are well-documented here.

For convenience, I recommend you deploy the workflow action script to “All Records” as illustrated above. This has no performance penalty as the workflow action script is always called from a workflow. Thus, we can limit the workflow to the transaction types of interest without worrying about having to create a new WA script deployment for each of those transaction types. The only downside of this approach is that the Workflow action will be available as a possible action for workflows of any record type. But that’s a minor thing; by properly naming the workflow action script, it will be clear that it is only applicable to transactions.
Tip: It is generally common to deploy workflow action scripts to all records as described above. For other script types, especially user event and client scripts, avoid doing this though as it might come with a performance penalty as the script will get evaluated on any and every record. It’s rare to have functionality that is so broadly applicable!
If you have use cases where the user who clicks the button might not have permission to edit the closed order, your WA script will need to execute as “Administrator” instead of the current role.

Step 2.2: Call the Workflow Action Script from the Workflow
As illustrated below, we can replace the workflow group action from our original solution with a call to the workflow action script. Again, this is not necessary for the use case at hand but useful to understand for those not familiar with the approach.

Solution 2: Script-Only Solution
Suppose you wanted to realize the same behavior via script, here’s a general outline of the steps you will take.
Step 1: Create a Client Script
As we need to trigger this functionality via a button, when the user clicks the button, the action will fire on client-side. Thus, we need a client script. Note that the script does not need to be deployed as it will be called from the user event script which we will create next. Thus, a custom script will suffice. You just need to be aware that you cannot call server-side NetSuite modules in such a script.
The code is very similar to the workflow action script we saw earlier. However, note that since this script is not deployed, we would either need to use N/currentRecord (preferred) or revert to SS 1.0 nlapiGetRecordType() and nlapGetRecordId() functions to determine the record type and ID, respectively. A third option would be to pass them in as parameters to the function call from the user event script.
/**
 * @NApiVersion 2.1
 * @NScriptType ClientScript
 */
define(['N/currentRecord', 'N/record'],

function(currentRecord, record) {

    const reopenOrder = () => {
        let rec = record.load({
            type: currentRecord.get().type, //nlapiGetRecordType(),
            id: currentRecord.get().id // nlapiGetRecordId()
        });

        let closedLine = rec.findSublistLineWithValue({ sublistId: 'item', fieldId: 'isclosed', value: true });
        if (closedLine >= 0) { // At least one line is closed
            for (let i = 0; i < rec.getLineCount('item'); ++i) {
                // Reopening a closed line is a no-op;
                // so we skip checking if the line is closed via getSublistValue().
                rec.setSublistValue({sublistId: 'item', fieldId: 'isclosed', line: i, value: false});
            }
        }
        rec.save({ ignoreMandatoryFields: true });
        window.location.reload(); // We can do this as we're on client side.
    }

    const pageInit = () => {
        // Placeholder to prevent possible
        // "entry point scripts must implement one script type function" error
    }

    return {reopenOrder, pageInit};

});
Step 2: Create a User Event Script
In the beforeLoad of the user event script, you’d conditionally show the “Reopen Button” and specify a client script that implements the business logic as illustrated below.
Two approaches come to mind for determining whether a transaction is closed:
- Check the transaction status
{status}and see if it is the closed status for the target transaction type. This would require knowing the closed status for each transaction type or modifying the code each time a new transaction type needs to be supported. Alternatively, you could try to do it based on the string value of the status field which is somewhat weak because there is no guarantee it will always be “Closed” and localization might affect this (not 100% sure). - Loop through all transaction lines and if they all have a closed field with value
true, you can infer that the transaction is closed. If the transaction type has no closed field, the code will not throw so this approach looks solid to me and is what I’ve illustrated below.
/**
 * @NApiVersion 2.1
 * @NScriptType UserEventScript
 */
define([],

    () => {
        const beforeLoad = (scriptContext) => {
           if (scriptContext.type === 'view') {
                let rec = scriptContext.newRecord;

                let numClosedLines = 0;
                for (let i = 0; i < rec.getLineCount('item'); ++i) {
                    if (rec.getSublistValue({sublistId: 'item', fieldId: 'isclosed', line: i})) {
                        ++numClosedLines;
                    }
                }

                let closed = (numClosedLines === rec.getLineCount('item'));
                if (closed) {
                    let form = scriptContext.form;
                    form.clientScriptModulePath = './CE_ClientUtils.js';
                    form.addButton({
                        id: 'custpage_nsi_reopen_order',
                        label: 'Reopen',
                        functionName: 'reopenOrder()'
                        // Alternatively, we can pass the record id and type as shown below
                        //functionName: `reopenOrder(${rec.id}, ${rec.type})`
                    });

            }
        }

        return {beforeLoad}

    });
Step 3: Deploy the User Event Script to Target NetSuite Transaction Types
This should be straightforward for anyone familiar with SuiteScript. As mentioned earlier, although it might be tempting to do so, do NOT deploy to all records as this will incur a penalty on record types that do not require the functionality.
Comparison of Solutions
We have seen three solutions – a workflow-only solution, a workflow plus WA script solution and a script-only solution. You might be wondering which to use and when. While a detailed comparison of workflows versus scripts is beyond the scope of this article, we can make a few observations.
Firstly, all three solutions get the job done. Thus, you have options. In terms of ease and compactness though, the workflow-only solution stands out as the most straightforward.
Secondly, the workflow approaches are more accessible and make it possible to have non-developers maintain the solution. For instance, if we needed to add extra criteria to control the button visibility, chances are that we can capture those in workflow conditions without needing to touch the code. And, if we need code logic, we can always use a workflow action script.
Thirdly, whereas we need a deployment of the user event script per transaction type of interest, we can easily select all transaction types in the workflow. In that sense, the workflow-based solutions are easier to manage.
Fourthly, the script-based solution allows us to inject logic upon clicking the button e.g. a confirmation popup whereas workflows do not offer any reasonable way to achieve the same.
Fifthly, if logging is enabled on the workflow, debugging is arguably easier. One can inspect the workflow execution logs on the record of interest and make assessments. And, the logs are persistent. On the other hands, script logs get flushed by NetSuite regularly (in most cases, daily) and they are intermingled (logs are not associated with a single record unless the developer produces the logs annotated them with record information).
Conclusions
For this use case, I would opt for the workflow-only solution largely based on points #1, #2, and #3 above. In general, I consider it more important to empower non-developer/NetSuite-admin type users to get the job done themselves than to write code. Although I LOVE to code, I place scripting at the bottom of NetSuite’s customization hierarchy to be used when SuiteBuilder and SuiteFlow do not suffice. Most of the clients I work with do not have a NetSuite developer in-house but often have someone who is technically sound enough to understand, maintain, and even build workflows. Thus, clients often appreciate workflows because they can see and grasp them. (Of course, I’m not talking of those crazy workflows with so many states that no one can follow what’s happening; there are extremes to everything.)
I have been in several conversations (especially with developers) where folks express an often unfounded aversion to workflows. In most cases, the underlying issue is inadequate experience with the tool and/or a lack of understanding of its limitations. I would admit that workflows in NetSuite have some rough edges but so does scripting. If you do not know; you’ll get burned. Nevertheless, it is a tool that can be leveraged even by developers, sometimes in combination with code, to produce solutions that adequately meet business requirements. That said, it is very important to remember that workflows are limited and, by themselves, do not offer the power and flexibility attainable with scripting. Thus, they are not a match for every use case.
If you’d be interested in learning more about workflows vs. scripts and which to use when, drop a line in the comments and I will consider a series dedicated to that topic. For now, choose which solution you prefer to automate reopening closed transactions. Your users will love you for it.
NetSuite Insights is on a mission to raise the standards around NetSuite practices, one insight at a time. If that resonates with you, learn how you can become an author/collaborator here.
Don’t miss a beat – subscribe to our no-nonsense email list to have these game-changing insights hit your inbox as soon as they’re published. Ignorance? Nah, you’ve got a smarter option. Choose wisdom, choose insights!